EEPROM Unlocks
Information
Before software licensing came around, during the Foundry and early Brocade days, the older FastIron switches used hardware licensing in the form of optional 16kbit EEPROM chips in a socket on the switches mainboard. These were either installed from factory, or you could purchase them and install them yourself.
The EEPROM would contain a magic string of letters and numbers, and when the switch OS saw this it knew to unlock said features. These products are now very old, have not been sold for a decade, and the below license EEPROMs are impossible to buy as the company no longer exists (Foundry is gone). I am providing the strings here to give these old pieces of hardware a little more life.
Note: All FastIron devices had two EEPROMs - a soldered in main EEPROM that contained chassis data like MAC address, serial number, manufacture date, etc. Then the second optional EEPROM in a removable socket: this is the EEPROM that contains the magic string. Some devices shipped with a blank EEPROM already in the slot that you can program from the bootloader, others came with none.
Programming Information
If the switch didn't come with a blank EEPROM already in the socket, you need to purchase one. They need to be AT24C164 chips, the later revision 24LC16B will not work. All US vendors I could find are out of these as they are old, this is the only place I could find to order some. They will take 3 to 4 weeks to arrive, but they work.
For programming the strings into the EEPROM, it's possible to do it from the v7 bootloaders with the i2cWriteByte command, but it involves multiple commands.
You can also buy a cheap EEPROM Programmer - see the EEPROM Programmer guide at the bottom of this page.
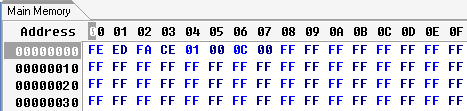
Note: These are raw HEX bytes (not ASCII) to be written starting at the beginning of the EEPROM. So your EEPROM programmer/contents should look like this:
EEPROM Unlock Strings
FCX Advanced Routing
The Brocade FCX was the last switch to use EEPROM based licensing - in fact, in the middle of its sales life, they added software based licensing. This means the FCX can be unlocked via an EEPROM, or via software license. The nice thing is every FCX seems to have come with a blank EEPROM in the socket already, so if you own one you can reboot into the bootloader and run the below to fully unlock it.
Note: Make sure you are running the latest bootloader, grz10100 - earlier bootloaders had different I2C addresses and the below command would not work.
Enter the bootloader (when the switch is booting fresh, over a serial connection, smash the b key until you drop into the bootloader prompt) then run the following commands:
i2c write a 0 feedface00000200ffffffffffffffff 1
reset
FESX424 & FESX448 Layer 3 Routing Upgrade
FEEDFACE02000C00
i2cWriteByte 40 0 fe
i2cWriteByte 40 1 ed
i2cWriteByte 40 2 fa
i2cWriteByte 40 3 ce
i2cWriteByte 40 4 2
i2cWriteByte 40 5 0
i2cWriteByte 40 6 c
i2cWriteByte 40 7 0
reset
SuperX Layer 3 Routing Upgrade
FEEDFACE09000C00
FGS / FLS 24 & 48 Port Stack Upgrade
Note: The stack upgrade also came with upgraded RAM (256MB DIMM versus the stock 128MB). Stacking will not work on this older platform without 256MB of RAM, so do not use this code without it.
FEEDFACE01001000
i2cWriteByte 40 0 fe
i2cWriteByte 40 1 ed
i2cWriteByte 40 2 fa
i2cWriteByte 40 3 ce
i2cWriteByte 40 4 1
i2cWriteByte 40 5 0
i2cWriteByte 40 6 10
i2cWriteByte 40 7 0
reset
FGS / FLS 24 & 48 Port Layer 3 Routing Upgrade
FEEDFACE01000100
i2cWriteByte 40 0 fe
i2cWriteByte 40 1 ed
i2cWriteByte 40 2 fa
i2cWriteByte 40 3 ce
i2cWriteByte 40 4 1
i2cWriteByte 40 5 0
i2cWriteByte 40 6 1
i2cWriteByte 40 7 0
reset
Using the CH341A EEPROM Writer
If you want to burn blank EEPROM chips yourself, you can pick up a $10 EEPROM Programmer. This will be a brief guide on using it under Windows.
First download this ZIP which contains the driver, software, and EEPROM dumps. Extract the ZIP to an easy to find location like your desktop.
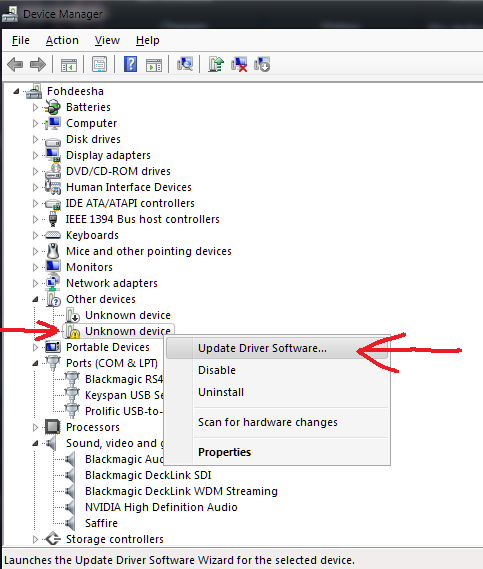
Put your EEPROM chip into the programmer socket - it should have a little picture silkscreened on the PCB showing you which direction to insert it. Once inserted, plug in the EEPROM Writer to a USB port - it will show up as an unrecognized device, you need to install the driver. Open up Device Manager and find it - it will be an Unknown Device with a yellow icon - then right click and hit update driver:
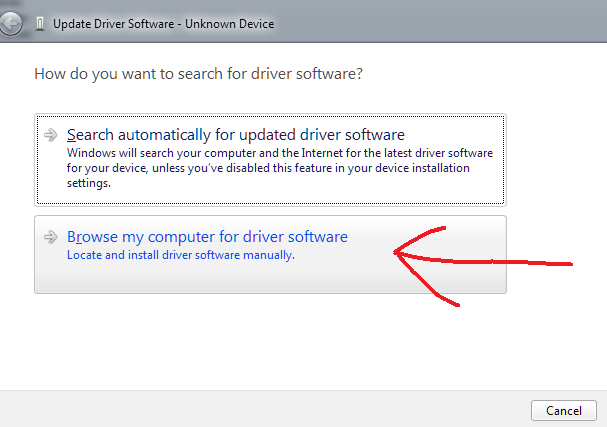
In the following prompt, select Browse my computer for driver software:
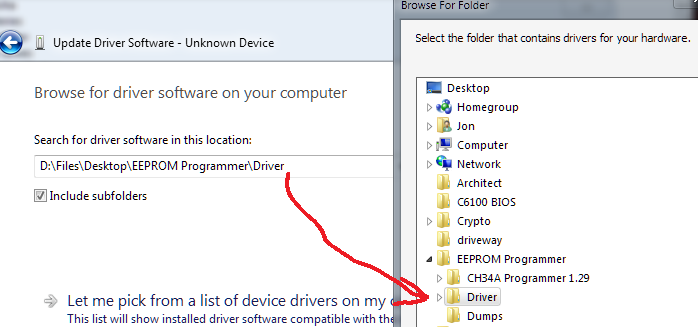
In the following prompt, browse to the folder you extracted from the ZIP, then select the Driver folder within it, then click OK/next:
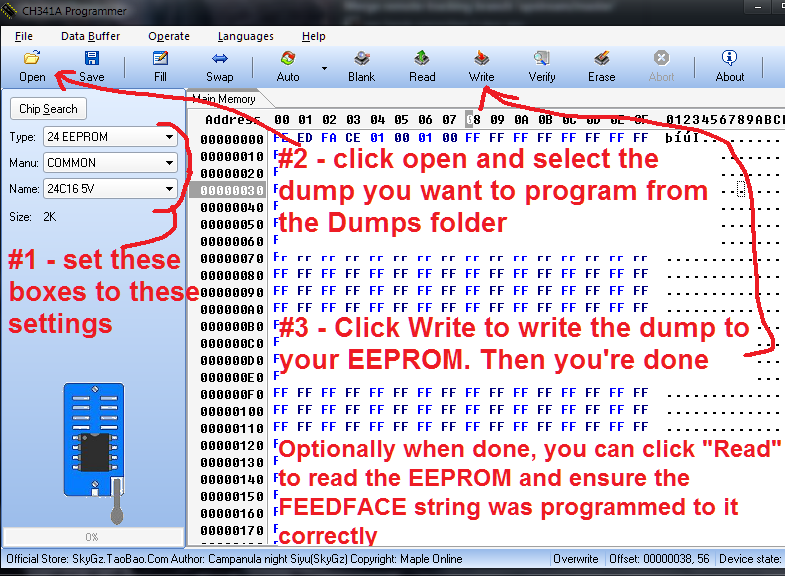
It should successfully install the driver, and you're good to go. Now launch the EEPROM programming software - in the CH341A Programmer 1.29 folder, double click the executable named Run Me, and it will launch the software. Now just follow the instructions in the image below to program the EEPROM. When done, just close the program and remove the EEPROM writer from your PC.