Setting up Brocade FCX & ICX6610
Preparation
If you haven't already, visit the Brocade Overview page to download the latest guide package and get it ready to be served via TFTP - this unified package includes all the latest firmware, licenses, and documentation.
Connect to the serial/console port using a program like Putty (9600 8N1), then connect the management ethernet port to your network (do NOT use any of the regular switch ports yet).
Power on the switch while watching your serial terminal - it will have a prompt saying Hit b to enter the boot monitor - press b quickly and you'll be dropped into the bootloader prompt, now we can upgrade the software. If you missed the prompt and it boots the OS instead, pull power and try again.
At the boot prompt, we need to give it a temporary IP in the subnet of your network, so it can talk to your TFTP server. This IP will not be used again after it leaves the bootloader. Replace the IP in the example below with an unused IP on your subnet:
ip address 192.168.1.50/24
copy tftp flash 192.168.1.8 ICX6610-FCX/grz10100.bin boot
After a few seconds it should finish, then we can flash the main OS. Replace the IP with the IP of your tftp server:
copy tftp flash 192.168.1.8 ICX6610-FCX/FCXR08030u.bin primary
factory set-default
reset
If you get "Unknown command factory"
If you get an Unknown command factory error, this means your switch has a very old bootloader. In that case since we just flashed the latest bootloader already, we just have to tell the switch to reset to load it. Then in the new bootloader the command will work:
reset
#hit b a bunch so it drops into the bootloader again
#now it's booted the latest bootloader, so the command will work:
factory set-default
reset
If your switch still claims to be a stack member after booting
If your switch says that it's part of a stack even after the above factory reset, you'll need to unstack it before being able to configure and update it. You'll see several prompts when booting that it's a stack member. You can unstack your switch by running the following command:
enable
stack unconfigure clean
# hit y at the prompt
Initial Configuration
Now that it's booted into the full OS you may get TFTP timed out errors in the console, this is normal. just hit enter until they go away. We'll fix that in the next section. Now to make any changes we must enter the enable level:
enable
configure terminal
ip dhcp-client disable
vlan 1
router-interface ve 1
exit
interface ve 1
ip address 192.168.1.55/24
exit
write mem
Note: You should now unplug your ethernet connection from the dedicated management port, and instead connect it to any of the regular switch ports. If you skip this, the rest of the guides will not work.
Update PoE Firmware
If your switch is the PoE model, you need to update the PoE controller firmware. If it's a non-PoE model, skip this section. Assuming you completed the previous section and the switch now has in-band network access (one of the regular ports are connected), just do the following:
exit
inline power install-firmware stack-unit 1 tftp 192.168.1.8 ICX6610-FCX/fcx_poeplus_02.1.0.b004.fw
#after a few seconds, hit enter to return to cli
#save changes you made from the previous section
write memory
#reload the switch
reload
#you'll probably get a message that it hasn't finished. it can take up to 10 minutes
#run "show log" occasionally to monitor the update progress
#try the "reload" command again once it's reached 100%
#once you've rebooted back into the OS:
enable
configure terminal
Further Configuration
You now have a bare minimum setup on your switch, and the latest firmware. To continue with further configuration including securing and naming the switch, setting up SSH and Web UI access, PoE commands etc, please continue to the ICX6xxx Series Config Page. Don't forget to return here when you're finished for the stack port, noise, and licensing info below if you need them.
ICX6610 Stack Ports
This optional section outlines how to use the ICX6610 rear "stacking only" QSFP+ ports as regular data ports instead. Note that two of the QSFP+ ports are 40gbE only, and the remaining two are 4x 10gbE breakout only. You must be on the latest FastIron release for this to work (so, follow the above update instructions if you haven't).
Removing Stack Configuration
There are going to be some stacking commands automatically put in your configuration, so we need to remove them. To see what you need to remove, show the config:
show run
stack unit 1
  module 1 icx6610-48-port-management-module
  module 2 icx6610-qsfp-10-port-160g-module
  module 3 icx6610-8-port-10g-dual-mode-module
  stack-trunk 1/2/1 to 1/2/2
  stack-trunk 1/2/6 to 1/2/7
We need to remove the two stack-trunk lines. Notice that they are under the stack unit 1 level, so you need to enter that CLI level first. While we're in there, we'll also disable stacking:
enable
conf t
stack unit 1
no stack-trunk 1/2/1 to 1/2/2
no stack-trunk 1/2/6 to 1/2/7
stack disable
exit
write mem
show run
stack-trunk commands, or any commands referencing stack ports. That's pretty much it! You can now use the ports on the rear as normal. However, see the next section on how they are laid out.
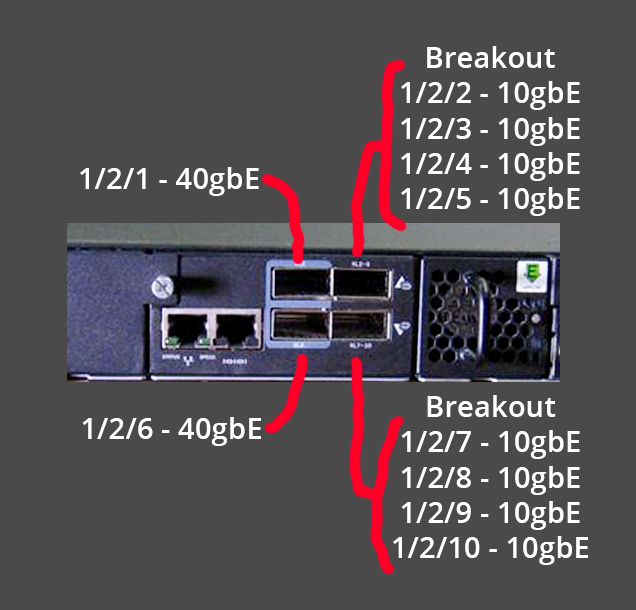
Port Layout
Keep in mind two of the rear ports are 4x 10gbE breakout only, and the remaining two are 40gbE only. The two 40gbE-only ports will NOT run at 10gbE (for instance with a QSFP to SFP+ adapter), so use these two for 40gbE links only. The extremely professional diagram below shows the port config and their associated port numbers in the OS:
Noise Info (ICX6610)
The ICX66610 power supply bricks came in 3 revisions: A, B, and C. These will have an affect on how loud the switch is. Generally with an A revision PSU anywhere, even combined with a B or C revision in the other PSU slot, the PSU fans will run louder.
The switch will be much quieter if you can find and run B and/or C revision bricks. There's no difference noise wise between B and C. Most sellers do not list the revision so you have to check the ebay pictures for the revision marking.
Also, it seems the PSU and fan tray position also affect fan speed. If you are running 1 PSU and fan tray, position them in the furthest left slots, when looking at the switch from the rear. If you have 2 PSUs and 1 fan tray, position the fan tray in the furthest left fan tray slot when looking at the rear of the switch.
Licensing Info
Like other EoL ICX6xxx series switches, the ICX6610 requires license file unlocks for 10gbE port functionality as well as some advanced software features. These licenses are no longer sold. To prevent e-waste and save these from landfills, I am providing free unlocks for use in a homelab or personal environment. Once you've finished the update and configuration process, proceed to the ICX6610 Licensing section to fully license and unlock your switch. If you have an FCX, you can use the FCX Licensing section.